What to do if faucet has no threads for water filter?
Installing a water filter on your faucet is an excellent way to ensure that you and your family are drinking clean and safe water. However, what if your faucet doesn’t have threads for the water filter? Should you give up on the idea of having clean water?
Many people face this dilemma when trying to install a water filter. They buy a filter only to realize that their faucet doesn’t have the necessary threads to attach it. This can be frustrating, especially if you have invested a significant amount of money in the filter.
If you find yourself in this situation, don’t worry. There are still options available to you. In this article, we will explore what to do if your faucet has no threads for a water filter. We will discuss alternative methods of installing a filter and provide you with some tips to ensure that you get the most out of your filter. So, let’s dive in and find a solution to this problem.
Definition of Threads
Threads are an essential component of a faucet, as they allow for the easy attachment of other plumbing parts, including water filters. In essence, threads are a series of ridges or grooves that run along the surface of the faucet’s spout. These ridges are designed to match the grooves on other plumbing components, allowing them to be connected securely and precisely.
However, in rare cases, faucets may not have threads, which can make attaching a water filter a challenging task. When a faucet lacks threads, the filter cannot be attached directly to the spout, and water flow can be impacted. In such cases, it is important to find alternative solutions to ensure that the faucet and the filter can be connected securely.
Step-by-Step Guide on How to Install Filter Without Threads
If you have a kitchen faucet without threads, it can be tricky to figure out how to attach a water filter. Thankfully, all hope is not lost. There are a few different ways to install a water filter without threads, and we’re here to walk you through the process step by step. So, don’t worry about the lack of threads on your faucet, follow this guide, and you’ll be enjoying clean, filtered water in no time!
Tools Needed for Installation
Here are the tools you will need to complete the installation process of a water filter without threads:
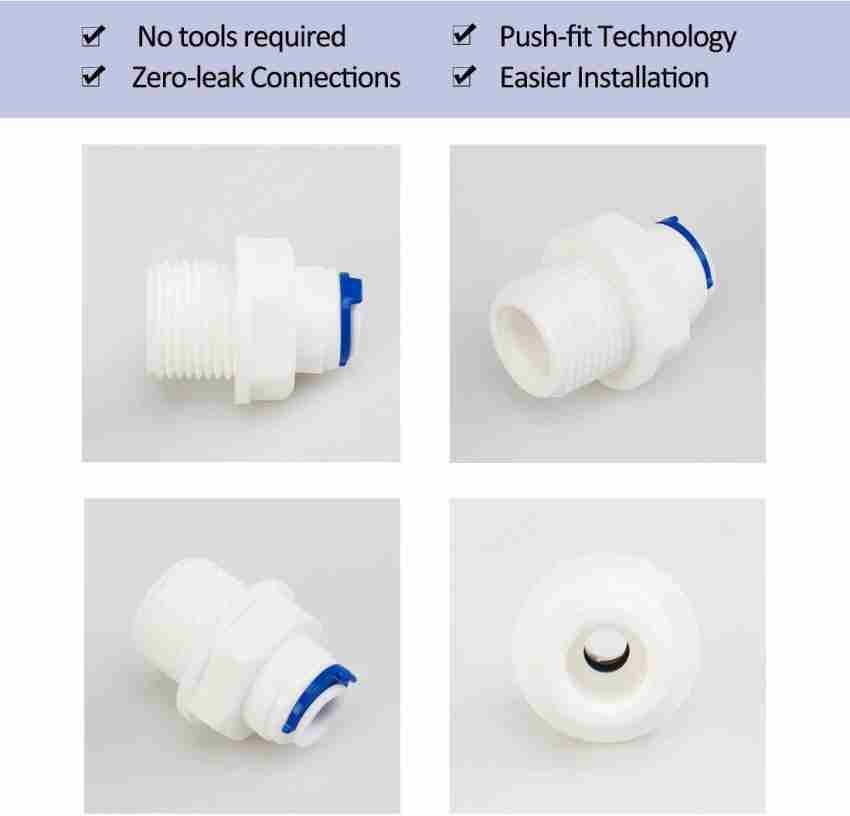
– Faucet adapter kit: This kit contains the necessary adapters and connectors required to attach the water filter to your faucet without threads. Depending on your faucet’s size and shape, you may require a specific adapter for your faucet type.
– Wrench: You may need a wrench to tighten the connections between the faucet adapter and the water filter.
– Cleaning supplies: Before attaching the faucet adapter, you’ll need to clean the faucet spout thoroughly. Consider using a cleaning agent to remove any mineral buildup or debris.
– Water filter system: To enjoy clean and filtered water, you’ll need to have a water filter system in place. Make sure you purchase a filter system that is compatible with your faucet adapter.
– Diverter valve: This valve helps you switch between filtered water and regular tap water. The diverter valve sits between the adapter and the water filter, so make sure to have it included with your water filter system.
– Teflon tape: This tape is used to create a watertight seal on your water filter system’s connections. It’s essential to prevent any leaks from happening between the water filter system components.
Step 1: Measure the Width of the Existing Faucet
When it comes to installing a water filter on your faucet without threads, the first step is to measure the width of the existing faucet. This is an essential step as it helps you identify the correct adapter that fits your faucet.
To measure the width, use a tape measure or ruler to measure the diameter of the faucet spout. Some faucets are threaded, which makes it easy to measure the width. However, if your faucet doesn’t have threads, measuring the width can be a bit tricky. In this case, you can measure the diameter of the faucet spout at the base. Once you have the measurement, take note of it and proceed to the next step.
Choosing the correct size of the faucet adapter is critical to ensure a snug fit between the faucet and the water filter system. Installing an adapter that’s too small or too big will not work and can cause leaks or damage to the faucet. Therefore, make sure to take accurate measurements before purchasing a faucet adapter kit. With the correct size adapter, you can easily attach the water filter system to the faucet without the need for threads.
Step 2: Choose an Appropriate Adapter Kit
Once you have determined the size of your faucet spout, the next step is to choose an appropriate adapter kit for your water filter. Faucet mounted filters typically come with various adapter sizes to fit a range of faucet sizes and shapes, so you can select one that matches the diameter of your faucet spout. Make sure to check the packaging or manufacturer’s website to ensure compatibility between your filter and the adapter kit you select.
It’s also essential to consider the type of faucet you have when choosing an adapter kit. Standard faucets with aerator threads typically work with most faucet mounts and adapter kits. However, rotating or swivel faucets with unique nozzle designs may require specific adapter designs. Furthermore, bathroom or handheld faucets may have different thread sizes than typical kitchen faucets, requiring a different adapter kit. Taking the time to select the correct adapter kit ensures a proper seal and a secure fit for your water filter, avoiding leaks and flow rate issues.
Step 3: Attach the Adapter Kit to the Faucet Head
Once you have selected an appropriate adapter kit for your faucet, the next step is to attach it to the faucet head. Before beginning, make sure the faucet and hands are clean, as any dirt or mineral buildup can affect the installation process.
Start by unscrewing the existing aerator from the faucet head. This is typically located at the end of the spout and may require a wrench or pliers to remove. Once removed, inspect the faucet head to ensure there is a smooth surface to attach the adapter kit to.
Next, select the appropriate adapter from the kit and screw it onto the faucet head. Most adapter kits come with a variety of adapters to fit different faucet sizes and shapes, so make sure to choose the one that matches your faucet spout. Once attached, tighten the adapter using a wrench or pliers, ensuring a snug and secure fit.
With the adapter kit securely attached to the faucet head, you can now attach your water filter to the adapter. Follow the manufacturer’s instructions to properly connect the filter to the adapter, taking care not to damage any components during the process. Once attached, turn on the faucet and check for any leaks or issues with the water stream. If everything looks good, you can now enjoy clean filtered water from your faucet without the need for any special plumbing installations.
Step 4: Connect the Water Supply Line to the Adapter Kit
After successfully attaching the adapter to your faucet, the next step is to connect the water supply line to the adapter kit. Before doing so, make sure to turn off the water supply under your sink to avoid any leaks or spills. This will also prevent any damage to your faucet or the adapter kit during installation.
Once the water supply is turned off, connect the water supply line to the adapter kit, making sure to tighten it securely using a wrench or pliers. Ensure that there are no leaks by turning on the water supply and checking for any drips or puddles. If there are any leaks, turn off the water supply and make any necessary adjustments.
By connecting the water supply line to the adapter kit, you can now start using your water filter with your kitchen faucet. Enjoy the benefits of clean and filtered water without the expense and hassle of buying a whole new faucet system.
Step 5: Turn Off Water Supply and Check for Leaks
Before connecting the adapter kit to your faucet, it’s essential to turn off the water supply under your sink. This step is crucial as it prevents any leaks or spills that could damage your faucet or the adapter kit during installation. To turn off the water supply, locate the valve under your sink and turn it clockwise until it stops.
Once the water supply is turned off, it’s time to connect the adapter kit to your faucet. After installation, turn on the water supply and check for any leaks. If there are any drips or puddles, it means there is a problem that needs fixing. In such a situation, turn off the water supply and identify the cause of the leak. It could be due to loose connections, damaged gaskets, or mineral buildup. Make any necessary adjustments to ensure that your setup is properly installed and not leaking.
Checking for leaks before using your water filter is essential to prevent any water wastage, increased water usage, and reduced flow rate. Addressing potential leaks immediately will save you from any future damage and additional repair costs. Remember to turn off the water supply under your sink after every use to prolong the lifespan of your faucet and filter system.
Meet Lila Robinson, an expert in the world of plumbing with a talent for delivering valuable insights and captivating articles on an array of plumbing topics. With years of experience handling complicated plumbing issues, Lila has become a go-to resource for homeowners and businesses alike.
Packing vast knowledge in plumbing tools and science, Lila creates a sense of community on her blog and social media accounts, engaging with readers from all walks of life. Her writing style is authentic, unique, and engaging, and she has an exceptional ability to break complex concepts into understandable ideas.
If you have encountered a plumbing issue, chances are Lila Robinson has conquered it. Her articles uncover the underlying problems behind some of the most unexpected plumbing problems, from tankless water heater error codes to drain snakes in vents.
Whether you’re a beginner or an experienced plumber, Lila Robinson’s blog has something for you. Follow her social media accounts to keep up-to-date with the latest posts and join the conversation.